Showing posts with label Sturmey-Archer. Show all posts

Saturday, July 18, 2015

How to Adjust a Sturmey-Archer Three-Speed Hub

Sometimes I actually post useful information. Sometimes.

So, I've kept kind of quiet about it, but ever since I put my Columbia Sports III back together last, uh, November, I've been having trouble getting the hub adjustment right. This is mostly the result of the fact that I experience problems while on a ride, stop to quickly make some stop-gap adjustments, then realizing later that it's still messed up, and just keep repeating the process. Finally, I got fed up with it, and decided to devote some time to getting everything adjusted exactly right.

As usual, Sheldon Brown has the definitive guidance on the subject, but I wanted to make things a bit more explicit and illustrated for you fellow first-timers. So, here we go:

Correct hub adjustment is extremely important. First, it allows you to take full advantage of all three of your gears. Second, it prevents "freewheeling," which isn't nearly as much fun as it sounds. Freewheeling on a 3-speed occurs when the internal gizmos in the hub align so that the pedals can spin forward without engaging the drive. In other words, the pedals are turning, but you're not moving the bike forward anymore. This can be extremely dangerous when you think you're solidly in a gear and pedaling along with resistance and suddenly your legs start spinning uncontrollably. This throws your whole bike/body alignment out of whack and you are certain to at least wobble, and possibly lose total control. Not good for riding in traffic or crossing an intersection, certainly.

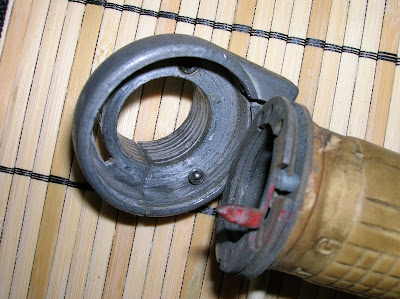
Proper adjustment is actually pretty easy, provided you have an ample dose of patience. There are basically only two parts to adjust: the indicator spindle, and the cable tensioner. The indicator spindle is the little rod and chain that emerges from the right side of the three-speed hub. One end of the rod is threaded with tiny threads, and this end screws into the hub itself (see photo). This is where you make your first adjustment.

Disengage the shifter cable from the indicator spindle so that you can unscrew the indicator spindle and take it all the way out of the hub. Check to make sure it's not bent or damaged. If everything is okay, reinsert the indicator spindle and tighten with just your fingers until it stops, then back it off a half turn. This is really important, because if you back it off too much, the indicator spindle doesn't fully engage with the gearing mechanism inside the hub. This was my problem, and caused me no little amount of frustration before I realized it. If the indicator spindle isn't seated properly in the hub, no amount of adjustment to the cable will help.

Now, reattach the cable to the indicator spindle. Tighten the cable tensioner (the barrel on the end of your shifter cable) by screwing it on to the indictor spindle, and use the little locknut on the indicator spindle to hold the tensioner in place. It should look something like this:

Now comes the tricky part. I'll let Sheldon Brown explain it, with particularly important passages highlighted:

For best results, adjust the cable by tension. When the trigger is in high gear position, the cable should be totally slack. Shift down to middle gear, while watching the indicator chain-it should clearly move as you make the shift. Then shift to low gear; again, you should see more chain coming out of the end of the axle. Sometimes the internal parts line up in such a way as to prevent downshifting. If you have trouble getting the hub to downshift, turn the pedals slightly forwards. Once you are sure you are in low gear, take hold of the indicator spindle chain and try to pull more of it out of the axle. If the adjustment is correct, you should be able to get just a tiny bit more movement from the chain. If it is completely taut, the cable is too tight. Make sure to tighten the knurled locknut on the indicator spindle so that the adjustment will stay as you have set it.

Double check the adjustment in all gears. In low gear, you should be able to see that the sprocket moves faster than the wheel, and the hub should not make a ticking sound while being pedaled forward. In middle gear, the sprocket should move at the same speed as the wheel, and you may hear a slow ticking as you pedal. In high gear, the wheel should turn faster than the sprocket. The same slow ticking may be audible in high gear.

If you hold the trigger halfway between middle and high gear, the hub should disengage so that you can spin the pedals forward without going anywhere. If it freewheels forward in high gear, the cable is to tight or has too much friction to release properly. If it freewheels forward in middle gear, the cable is too loose.

If you're anything like me, you will have to make many minute adjustments to the cable tension until you get it just right. The key points again: 1) properly seat indicator spindle in hub; 2) freewheel in high gear means cable is too tight; 3) freewheel in middle gear or low gear means cable is too loose; 4) there should be no ticking sound when pedaled forward in low gear; 5) hub should freewheel between 2nd and 3rd gear.

If you would like to read Sheldon Brown's original article in its entirely, go here. Sheldon also has lots of other great information about three speed (a.k.a. planetary, or epicyclic) gearing, including diagrams that show what's going on in there.

By the way, my experience related here is based on the Sturmey-Archer AW hub that is original to my Columbia, I have no experience with other S-A models or other hub-geared systems.

Monday, June 29, 2015

Sturmey-Archer Shifter Before/After

I thought I'd have a go at resurrecting the original trigger shifter on the Huffy/Raleigh instead of putting on a new one. I really like the name plate on this one, so I wanted to try to keep it. These were not made to be dissembled, so I had to use a cotton swab soaked with cleaner (actually, just rubbing alcohol) to get to the inside parts. I also used a small screwdriver and a toothpick to get way in there and chip the dirt and grit away. I'll put a couple drops of oil in there when I'm ready to put it back on, and it should be fine.

To clean up the outside, I used my usual combination of fine steel wool and light oil, followed by Brasso. I would have used RidingPretty's wonderful green cleaning techniques, but I had that part done several weeks ago before she guest-posted here. Finally, I used a bit of red and black craft paint on a paper towel to refresh the color on the lettering. I just applied the paint across the letters with a corner of the towel, then wiped away the excess from the surface. It's not perfect, but certainly looks better than it did.

Tuesday, June 23, 2015

Sturmey-Archer Hub

Here's a nice photo I snapped of the Huffeigh's Sturmey-Archer AW hub before I reassemble the wheel. Just gratuitous old bike pron.

1955 Huffy/Raleigh Sportsman FINISHED!


Sweet Fancy Moses, this has been a long project! I started this back at the end of November, which makes it just shy of a full five months. Here's what I did:

-CLEAN, CLEAN, CLEAN
-replaced crappy saddle with less-crappy used Brooks B72
-replaced stuck stem/bars after sawing off original
-replaced badly pitted and gouged crank axle
-replaced crank cotters
-replaced missing hub hardware and shifter cable
-replaced tires/tubes/rim tape
-replaced brake shoes
-replaced grips
-cleaned and repacked headset, bottom bracket, hubs
-sanded, primed, painted fenders, top tube, chain stays
-touch up and clear coat entire bike

The photos above are actually a bit disingenuous, since the chain guard isn't attached due to the chain rubbing on it terribly ("grinding" is really more the word). I was a bit worried about that from the beginning because of the wear patterns on the inside of the guard when I bought the bike, but I thought they might just be from years of neglect. I can't quite figure out why it's rubbing, actually, since the attachment points on the frame don't leave a lot of room for interpretation or adjustment. It must be on correctly, but it still rubs. Still working on that one.

Otherwise, it runs very well. It's very comfortable and smooth and surprisingly light. I had some trouble with the rear sprocket, the teeth of which had been misshaped due either to a too-tight or poorly maintained chain. When under way, the chain sounded like it was grinding through a poorly-adjusted derailer, which clearly wouldn't do. I swapped out the sprocket from the Columbia, and in the process, discovered that the sprocket on the Huffy had been put on backwards. I put it on the Columbia the right way to see if it would run any better, and it did! So, the Huffeigh sprocket is now working just fine on the Columbia, and the Columbia sprocket is working just fine on the Huffeigh. Thank you, Sturmey-Archer, for making such brilliantly-interchangeable parts.

I had planned on this being a cargo/grocery bike, but it turned out to be entirely too gentlemanly to be a beast of burden, so the Wald wire pannier rack I bought is now on the Columbia, which has been re-dubbed the grocery bike, while the Huffeigh will fill the Columbia's previous function as general run-around bike.

Monday, June 15, 2015

Salvaging a Hub, Part II

The final cleanup on the salvaged Sturmey-Archer TCW III was accomplished by scraping the remaining rust off with a razor blade, then several rounds of polishing with rubbing compound and Brasso. Some areas of the chrome have been cosmetically damaged by the rust, but not the scraping. There has been no structural damage to any of the exterior pieces of this hub. In fact, all cleaned up, many of the bits are in better shape than those on the Huffeigh. I don't post this to gloat (okay, maybe a little), but to demonstrate that even a hub that looks as bad as this one did may be worth a try to salvage and make useable again. Don't give up on bike or on salvage parts just because they look a little rough!

Friday, June 12, 2015

Watching Dry Paint

My plans to finish the paint this week have been stymied by high humidity. I have the paint itself all finished, and it came out looking great, but I'm holding off posting photos until I get the clear coat on and the masking tape off. I want to wait for a good dry day to do the clear coat, since it can be finicky.

In the meantime, I'm cleaning what little I can access of the rear hub and greasing the bearings. I had intended to dismantle the hub and completely clean it, but there's a retaining ring that won't budge that has to come off in order to pull the whole internal works out of the hub shell. I've taken the sprocket off, and dumped the bearings out for cleaning, and what I can see of the other internal gizmos, it doesn't look too bad. I'll put some oil directly in there before closing everything up, and then some more via the oil cap when I'm ready to ride it. Hopefully that'll do the trick. I'm a little wary of this hub, since I was not able to ride it before starting the restoration, and I don't even know if it works. With my luck, it'll be completely buggered, and all this work will be for naught.

Thursday, June 11, 2015

Salvaging a Hub

I know I have lots of updates to give on various projects, which I will hopefully get to this week, but in the meantime, here are some photos of my latest project, which is really just a side project for the Phillips roadster.

My friend Mauricio tipped me off to a cheap junker bike at a local estate sale. I picked up what's left of this 1964 Huffy Sportsman for $10, and I'll probably be able to salvage a few things, but the main thing was the rear hub. It's a Sturmey-Archer TCW III, a three-speed coaster brake hub. Sheldon Brown says the TCW series is unreliable as a coaster hub, citing possible failure of the brake if the cable is not properly adjusted, but for the money, I'm willing to give it a try.

My wife has hinted that perhaps she would like to ride the Phillips when it's finished and she really liked the idea of a coaster brake. I, however, wanted to put a three-speed hub on it, so here's the compromise, which suits all parties. True, it's not period-correct for the Phillips, but the correct K Series Sturmey-Archer hubs seem to be hard to come by and somewhat expensive, and not available in a coaster brake model. We'll have the rod brakes, too, just in case there's a problem with the coaster brake.

Here's a little photo series on my efforts to salvage the hub:

The before photos:

I had to cut the spokes with a pair of aviation snips because the nipples were too corroded to turn and the spokes too rotten to reuse.

Below, the top layer of gunk and rust has been scraped off:

Below, rust removal continues with fine steel wool, penetrating oil, rubbing compound, and even very carefully applied sandpaper over the worst rust spots, never used directly on the chrome.

The external cleanup on this hub is probably about half-finished. I'm hoping for near-pristine by the time I'm done, but it's going to take a lot more elbow grease to get there. I took a peek at the internals, and everything is surprisingly clean in there, so maybe I can get away with not dismantling it entirely.

Sunday, June 7, 2015

How To Dismantle a Sturmey-Archer Grip Shifter

After another evening of work on Mauricio's 1969 Huffy/Raleigh Sportsman, I took the grip shifter home to try to figure it out. Turns out, it's pretty simple on the inside, but since I couldn't find any how-to guides on the interwebs about it, I thought I'd post one.

The whole works is basically held together by a little spring clip that fits just under the lip of the dial portion of the grip. I used a small screwdriver to pry the clip out of its channel. In the photo below, you see the clip after removal.

With that done, the housing for the shifter (at left above) just comes off (assuming you've already removed the screw that tightens the shifter to the handlebar), exposing the minimal inner workings of the mechanism. There are basically three parts: a small spring, a bearing, and the rotating mechanism to which the cable is attached. The spring sits in a little hole, and the bearing on top of the spring. When the grip is turned, the bearing slides into one of three holes in the rotating mechanism, either tightening or loosening the shifter cable, and thus shifting the hub.

In the photo above, you can see the rotating mechanism at right with the red indicator arrow on it. Below, you can see the spring in its hole, with the bearing resting on top.

That's about it. I haven't put the thing back together yet, but I'm guessing that making sure the cable and bearing stay in place while the spring clip is reattached is going to require at least one more hand than I currently have. I'll have to look into getting another one.

There's a fuzzy diagram here of the whole works, and if you combine it with the photos above, you can get a pretty good idea of how it all works. Apparently, though, this was not a very successful design and seems to have only been on 1960s bikes.

Sturmey-Archer Trigger Shifters

In trying to figure out why the nameplate on my Huffy/Raleigh's Sturmey-Archer trigger shifter is upside-down, I've been directed to the following very informative article on the history of the S-A trigger shifter. Fair warning, the link goes to a rather large PDF.

Reader Project: Mauricio's 1969 Huffy Sportsman


Ah, the wonders of the interwebs and the machinations of fate. Mauricio happened to take a wrong turn the other day, and when he stopped to ask directions, noticed the white tail of this Raleigh-made Huffy Sportsman peeking out of a garage. He asked if the bike was for sale, and lo and behold, took this lovely specimen home for a mere $10. Pretty good haul for getting lost.

So then, whilst Googling "Huffy Sportsman" he found my blog, and (this is the best part) discovered that we live only about twenty minutes away from each other. Long story short, that's Yours Truly in some of the photos below.


I went over to Mauricio's last night and we got started taking things apart. This is Mauricio's first old bike project, and it's perfect for learning. The cables are all broken, the rust is pervasive, but not impossible, and much of the chrome appears to be nearly pristine under the thickest coat of road/storage grime I've ever seen. It took a fair amount of work to even find the date stamp on the hub. The really cool thing is that this bike is equipped with a Sturmey-Archer grip-shifter, which I've never worked on before, so I get to learn something new.

More photos to come as Mauricio and I get our hands dirty and get his bike ready to roll again.

Images: Except for the one at top, all photos by Mauricio.